App启动流程分析

前言

上一篇文章中我分析了Activity的启动流程,是建立在App进程已经创建完成(即App已经打开)的情况下的,那么App从点击图标到启动Activity这个过程是怎么样的呢,本文就来简单分析一下。

源码分析

首先还是先强调一下,本文的分析基于Android 9.0(API Level 28)的源码
Android系统的桌面其实就是一个App,这个特殊的App叫做Launcher,很多手机生产厂商都有自己定制的Launcher,因此不同的手机桌面样式会有些许的不同。目前Android原生的Launcher版本是Launcher3,而我们桌面上所展示的Activity的就是Launcher3中的Launcher.java,在这个Activity中展示着手机上安装的应用程序快捷方式,它的定义如下:
Launcher.java

1
2
3
4
public class Launcher extends BaseDraggingActivity implements LauncherExterns,
LauncherModel.Callbacks, LauncherProviderChangeListener, UserEventDelegate {
// ...
}

Launcher中声明了一个createShortcut()方法,从方法名也能猜到是用来创建应用快捷方式(图标)的。

1
2
3
4
5
6
7
8
public View createShortcut(ViewGroup parent, ShortcutInfo info) {
BubbleTextView favorite = (BubbleTextView) LayoutInflater.from(parent.getContext())
.inflate(R.layout.app_icon, parent, false);
favorite.applyFromShortcutInfo(info);
favorite.setOnClickListener(ItemClickHandler.INSTANCE);
favorite.setOnFocusChangeListener(mFocusHandler);
return favorite;
}

由于我们要研究App的启动流程,因此首先要从点击图标的方法来入手,可以看出点击事件定义在了ItemClickHandler类中,我们来看一下:
ItemClickHandler.java

1
2
3
4
5
6
7
8
9
10
11
12
13
14
15
16
17
18
19
20
21
22
23
24
25
26
27
28
29
30
31
32
33
34
35
36
37
38
39
40
41
42
43
44
45
46
47
48
49
50
51
52
53
54
55
56
57
58
59
60
61
public class ItemClickHandler {

/**
* Instance used for click handling on items
*/
public static final OnClickListener INSTANCE = ItemClickHandler::onClick;

private static void onClick(View v) {
// ...
// 应用的启动信息包含在了tag中,包括要启动哪个Activity等等
Object tag = v.getTag();
if (tag instanceof ShortcutInfo) {
// 核心代码
// 点击应用快捷方式调用该方法
onClickAppShortcut(v, (ShortcutInfo) tag, launcher);
} else if (tag instanceof FolderInfo) {
if (v instanceof FolderIcon) {
onClickFolderIcon(v);
}
} else if (tag instanceof AppInfo) {
startAppShortcutOrInfoActivity(v, (AppInfo) tag, launcher);
} else if (tag instanceof LauncherAppWidgetInfo) {
if (v instanceof PendingAppWidgetHostView) {
onClickPendingWidget((PendingAppWidgetHostView) v, launcher);
}
}
}

private static void onClickAppShortcut(View v, ShortcutInfo shortcut, Launcher launcher) {
// ...
// Start activities
startAppShortcutOrInfoActivity(v, shortcut, launcher);
}

private static void startAppShortcutOrInfoActivity(View v, ItemInfo item, Launcher launcher) {
Intent intent;
if (item instanceof PromiseAppInfo) {
PromiseAppInfo promiseAppInfo = (PromiseAppInfo) item;
intent = promiseAppInfo.getMarketIntent(launcher);
} else {
intent = item.getIntent();
}
if (intent == null) {
throw new IllegalArgumentException("Input must have a valid intent");
}
if (item instanceof ShortcutInfo) {
ShortcutInfo si = (ShortcutInfo) item;
if (si.hasStatusFlag(ShortcutInfo.FLAG_SUPPORTS_WEB_UI)
&& intent.getAction() == Intent.ACTION_VIEW) {
// make a copy of the intent that has the package set to null
// we do this because the platform sometimes disables instant
// apps temporarily (triggered by the user) and fallbacks to the
// web ui. This only works though if the package isn't set
intent = new Intent(intent);
intent.setPackage(null);
}
}
// 核心代码
launcher.startActivitySafely(v, intent, item);
}
}

ItemClickHandler的onClick()方法判断了如果点击的是应用快捷方式就调用onClickAppShortcut()方法,接着又调用了startAppShortcutOrInfoActivity()方法,最后会调用Launcher的startActivitySafely()方法。

1
2
3
4
5
6
7
8
9
10
11
12
13
public boolean startActivitySafely(View v, Intent intent, ItemInfo item) {
boolean success = super.startActivitySafely(v, intent, item);
if (success && v instanceof BubbleTextView) {
// This is set to the view that launched the activity that navigated the user away
// from launcher. Since there is no callback for when the activity has finished
// launching, enable the press state and keep this reference to reset the press
// state when we return to launcher.
BubbleTextView btv = (BubbleTextView) v;
btv.setStayPressed(true);
setOnResumeCallback(btv);
}
return success;
}

该方法又调用了父类BaseDraggingActivitystartActivitySafely()方法:

1
2
3
4
5
6
7
8
9
10
public boolean startActivitySafely(View v, Intent intent, ItemInfo item) {
// ...
// Prepare intent
intent.addFlags(Intent.FLAG_ACTIVITY_NEW_TASK);
// ...
// Could be launching some bookkeeping activity
startActivity(intent, optsBundle);
// ...
return false;
}

可以看到startActivitySafely()方法最终调用了startActivity()方法,并设置了FLAG_ACTIVITY_NEW_TASK这个Flag,不难理解,启动一个App肯定是要创建一个新的Activity任务栈的。
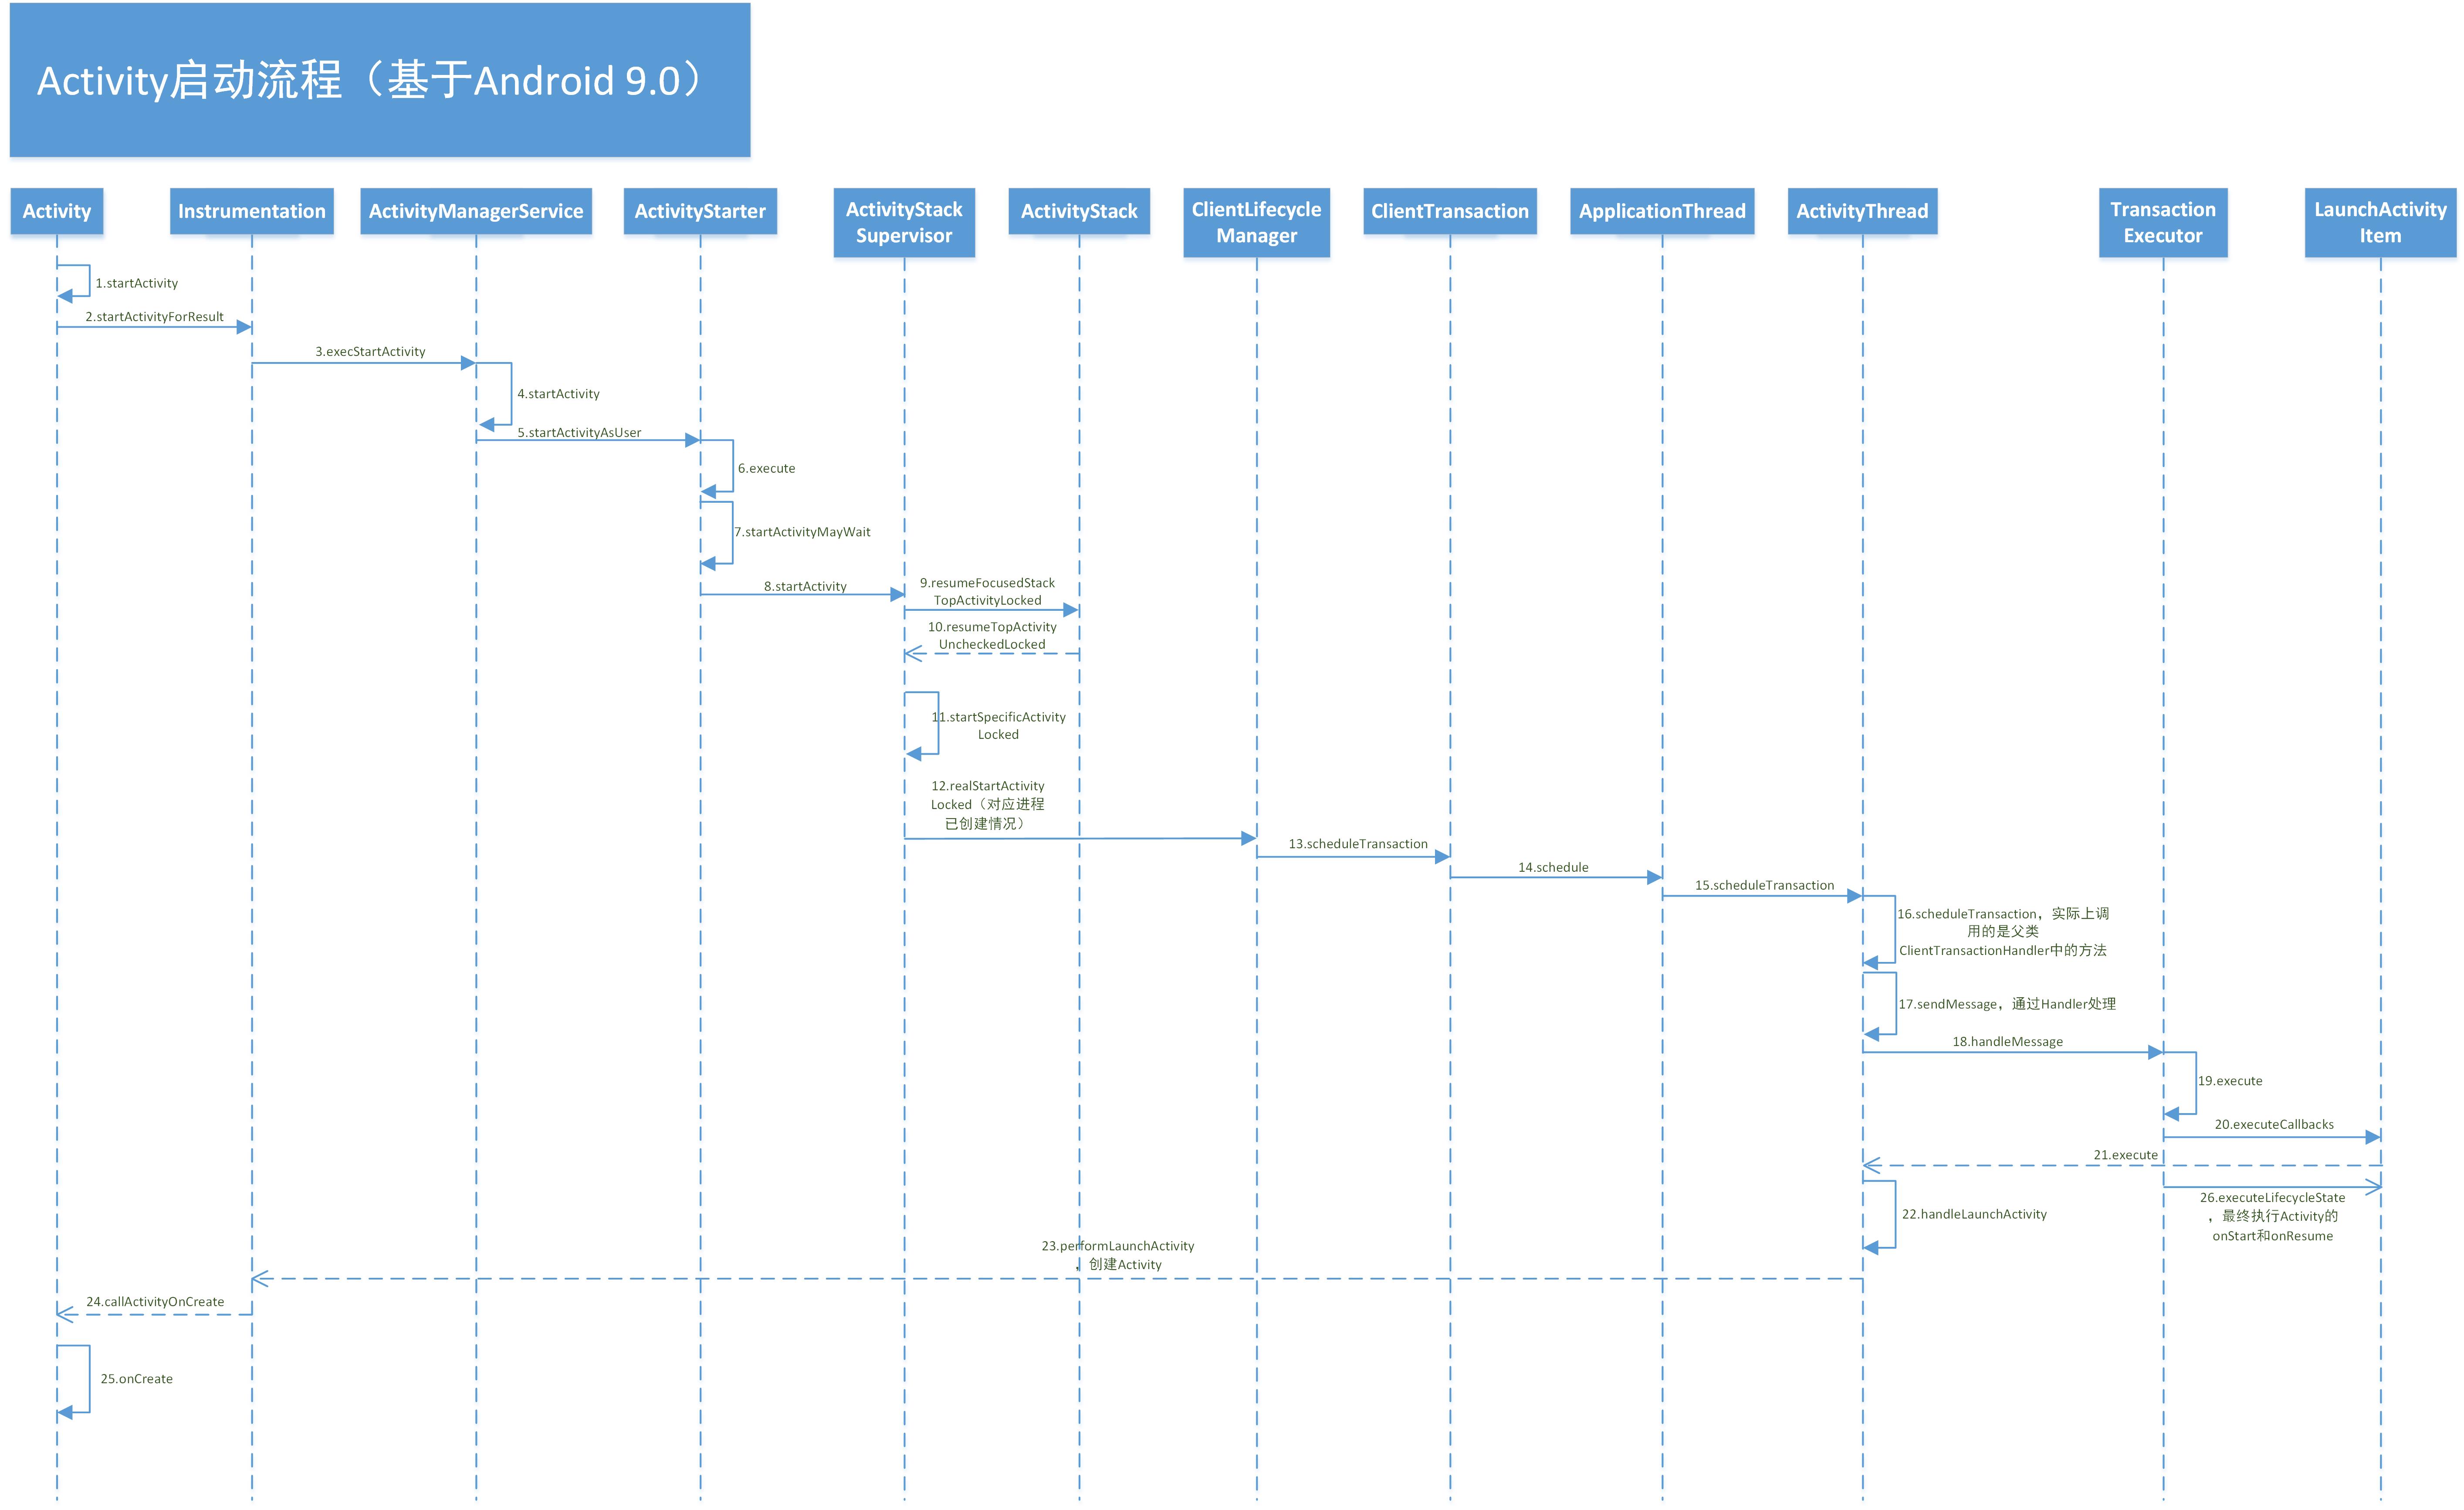
到这里就又回到了Activity的startActivity()方法,也就是Activity的启动流程,这一部分我就不从头开始分析了了,可以查看上一篇文章Activity启动流程,这里附上Activity启动的流程图。

Activity启动流程

我们跳过一部分流程,直接来看ActivityStackSupervisorstartSpecificActivityLocked()方法:

1
2
3
4
5
6
7
8
9
10
11
12
13
14
15
16
17
18
19
20
21
22
23
24
25
26
27
28
void startSpecificActivityLocked(ActivityRecord r,
boolean andResume, boolean checkConfig) {
// 获取应用进程
ProcessRecord app = mService.getProcessRecordLocked(r.processName,
r.info.applicationInfo.uid, true);

getLaunchTimeTracker().setLaunchTime(r);

if (app != null && app.thread != null) {
// 进程已创建
try {
// ...
// 核心代码
realStartActivityLocked(r, app, andResume, checkConfig);
return;
} catch (RemoteException e) {
Slog.w(TAG, "Exception when starting activity "
+ r.intent.getComponent().flattenToShortString(), e);
}

// If a dead object exception was thrown -- fall through to
// restart the application.
}

// 进程不存在则创建应用进程
mService.startProcessLocked(r.processName, r.info.applicationInfo, true, 0,
"activity", r.intent.getComponent(), false, false, true);
}

在Activity的启动流程分析中,我直接默认为App进程已创建,这里就要分析另一种情况了,也就是应用进程未创建,这种情况会执行mService.startProcessLocked()方法,mService的类型是ActivityManagerService(AMS),我们来看ActivityManagerService的startProcessLocked()方法:

1
2
3
4
5
6
7
8
9
10
11
12
13
14
15
16
17
18
19
20
21
22
23
24
25
26
27
28
29
30
31
32
33
34
35
36
37
38
39
40
41
42
43
44
45
46
47
48
49
50
51
52
53
54
55
56
final ProcessRecord startProcessLocked(String processName,
ApplicationInfo info, boolean knownToBeDead, int intentFlags,
String hostingType, ComponentName hostingName, boolean allowWhileBooting,
boolean isolated, boolean keepIfLarge) {
return startProcessLocked(processName, info, knownToBeDead, intentFlags, hostingType,
hostingName, allowWhileBooting, isolated, 0 /* isolatedUid */, keepIfLarge,
null /* ABI override */, null /* entryPoint */, null /* entryPointArgs */,
null /* crashHandler */);
}

final ProcessRecord startProcessLocked(String processName, ApplicationInfo info,
boolean knownToBeDead, int intentFlags, String hostingType, ComponentName hostingName,
boolean allowWhileBooting, boolean isolated, int isolatedUid, boolean keepIfLarge,
String abiOverride, String entryPoint, String[] entryPointArgs, Runnable crashHandler) {
// ...
final boolean success = startProcessLocked(app, hostingType, hostingNameStr, abiOverride);
// ...
}

private final boolean startProcessLocked(ProcessRecord app,
String hostingType, String hostingNameStr, String abiOverride) {
return startProcessLocked(app, hostingType, hostingNameStr,
false /* disableHiddenApiChecks */, abiOverride);
}

private final boolean startProcessLocked(ProcessRecord app, String hostingType,
String hostingNameStr, boolean disableHiddenApiChecks, String abiOverride) {
// ...
return startProcessLocked(hostingType, hostingNameStr, entryPoint, app, uid, gids,
runtimeFlags, mountExternal, seInfo, requiredAbi, instructionSet, invokeWith,
startTime);
}

private boolean startProcessLocked(String hostingType, String hostingNameStr, String entryPoint,
ProcessRecord app, int uid, int[] gids, int runtimeFlags, int mountExternal,
String seInfo, String requiredAbi, String instructionSet, String invokeWith,
long startTime) {
// ...
final ProcessStartResult startResult = startProcess(app.hostingType, entryPoint,
app, app.startUid, gids, runtimeFlags, mountExternal, app.seInfo,
requiredAbi, instructionSet, invokeWith, app.startTime);
// ...
}

private ProcessStartResult startProcess(String hostingType, String entryPoint,
ProcessRecord app, int uid, int[] gids, int runtimeFlags, int mountExternal,
String seInfo, String requiredAbi, String instructionSet, String invokeWith,
long startTime) {
// ...
startResult = Process.start(entryPoint,
app.processName, uid, uid, gids, runtimeFlags, mountExternal,
app.info.targetSdkVersion, seInfo, requiredAbi, instructionSet,
app.info.dataDir, invokeWith,
new String[]{PROC_START_SEQ_IDENT + app.startSeq});
// ...
}

经过一系列调用最终执行了Process.start()方法:

1
2
3
4
5
6
7
8
9
10
11
12
13
14
15
public static final ProcessStartResult start(final String processClass,
final String niceName,
int uid, int gid, int[] gids,
int runtimeFlags, int mountExternal,
int targetSdkVersion,
String seInfo,
String abi,
String instructionSet,
String appDataDir,
String invokeWith,
String[] zygoteArgs) {
return zygoteProcess.start(processClass, niceName, uid, gid, gids,
runtimeFlags, mountExternal, targetSdkVersion, seInfo,
abi, instructionSet, appDataDir, invokeWith, zygoteArgs);
}

接着又调用了ZygoteProcessstart()方法:

1
2
3
4
5
6
7
8
9
10
11
12
13
14
15
16
17
18
19
20
21
22
23
24
25
26
27
28
29
30
31
32
33
34
35
36
37
38
39
40
41
42
43
44
45
46
47
48
49
50
51
52
53
54
55
56
57
58
59
60
61
62
63
64
65
66
67
68
69
70
71
72
73
74
public final Process.ProcessStartResult start(final String processClass,
final String niceName,
int uid, int gid, int[] gids,
int runtimeFlags, int mountExternal,
int targetSdkVersion,
String seInfo,
String abi,
String instructionSet,
String appDataDir,
String invokeWith,
String[] zygoteArgs) {
try {
return startViaZygote(processClass, niceName, uid, gid, gids,
runtimeFlags, mountExternal, targetSdkVersion, seInfo,
abi, instructionSet, appDataDir, invokeWith, false /* startChildZygote */,
zygoteArgs);
} catch (ZygoteStartFailedEx ex) {
Log.e(LOG_TAG,
"Starting VM process through Zygote failed");
throw new RuntimeException(
"Starting VM process through Zygote failed", ex);
}
}

private Process.ProcessStartResult startViaZygote(final String processClass,
final String niceName,
final int uid, final int gid,
final int[] gids,
int runtimeFlags, int mountExternal,
int targetSdkVersion,
String seInfo,
String abi,
String instructionSet,
String appDataDir,
String invokeWith,
boolean startChildZygote,
String[] extraArgs)
throws ZygoteStartFailedEx {
// ...
return zygoteSendArgsAndGetResult(openZygoteSocketIfNeeded(abi), argsForZygote);
}

private static Process.ProcessStartResult zygoteSendArgsAndGetResult(
ZygoteState zygoteState, ArrayList<String> args)
throws ZygoteStartFailedEx {
// ...
final BufferedWriter writer = zygoteState.writer;
final DataInputStream inputStream = zygoteState.inputStream;

writer.write(Integer.toString(args.size()));
writer.newLine();

for (int i = 0; i < sz; i++) {
String arg = args.get(i);
writer.write(arg);
writer.newLine();
}

writer.flush();

// Should there be a timeout on this?
Process.ProcessStartResult result = new Process.ProcessStartResult();

// Always read the entire result from the input stream to avoid leaving
// bytes in the stream for future process starts to accidentally stumble
// upon.
result.pid = inputStream.readInt();
result.usingWrapper = inputStream.readBoolean();

if (result.pid < 0) {
throw new ZygoteStartFailedEx("fork() failed");
}
return result;
}

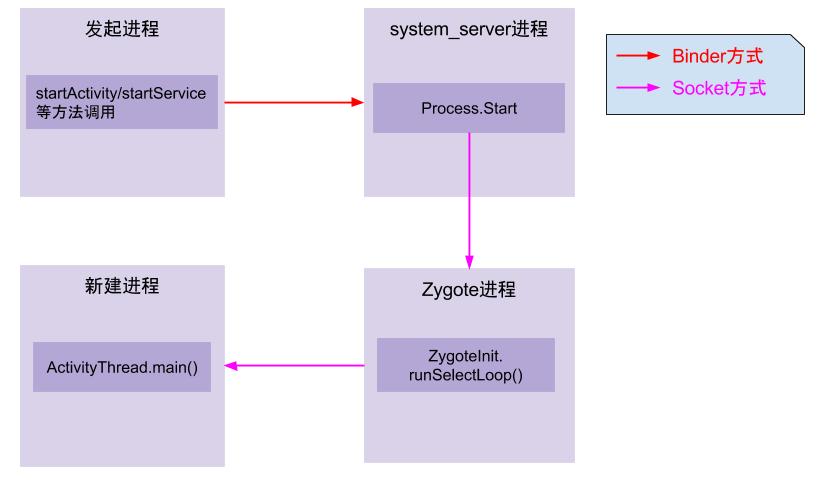
这里又是经过了一系列的调用,最终执行了zygoteSendArgsAndGetResult()方法,该方法的作用就是创建App进程。关于App进程的创建,我粗略地阅读了一下网上的相关文章,简单介绍一下,Android中有一个重要的进程Zygote,翻译为受精卵进程,所有的应用程序进程都是通过Zygote进程fork得来的。流程简单来说就是通过Binder请求AMS进程,然后AMS再发送Socket消息给Zygote进程,最后统一由Zygote进程fork出应用进程。由于应用程序进程的创建涉及到了Android的一些底层原理,包括Linux的一些知识,目前我也不能说得很清楚,因此就简单介绍一下,感兴趣的话自行查阅资料吧,这里附上一张Gityuan大神绘制的的流程图。

App进程创建图

进程创建完成后,就会执行ActivityThreadmain()方法,它是应用程序的入口方法(当然从应用进程创建到执行main()方法这中间的过程还要更复杂,本文就不深入探讨了)。

1
2
3
4
5
6
7
8
9
10
11
12
13
14
15
public static void main(String[] args) {
// ...
// 创建主线程Looper
Looper.prepareMainLooper();

// ...
// 核心代码
ActivityThread thread = new ActivityThread();
thread.attach(false, startSeq);

// ...
// 开启消息循环
Looper.loop();
// ...
}

main()方法内部创建了主线程Looper并开启了消息循环,由于这不是本文的重点,就不多提了。此外,还创建了ActivityThread对象并调用了attach()方法,我们接下来看一下这个方法。

1
2
3
4
5
6
7
private void attach(boolean system, long startSeq) {
// ...
// 核心代码
final IActivityManager mgr = ActivityManager.getService();
mgr.attachApplication(mAppThread, startSeq);
// ...
}

这里省略了大量代码,核心代码就是调用mgr.attachApplication()方法,其中mgr是通过ActivityManager.getService()得到的,因此就是ActivityManagerService对象,我们来看AMS的attachApplication()方法:

1
2
3
4
5
6
7
8
9
10
@Override
public final void attachApplication(IApplicationThread thread, long startSeq) {
synchronized (this) {
int callingPid = Binder.getCallingPid();
final int callingUid = Binder.getCallingUid();
final long origId = Binder.clearCallingIdentity();
attachApplicationLocked(thread, callingPid, callingUid, startSeq);
Binder.restoreCallingIdentity(origId);
}
}

attachApplication()方法内部又调用了attachApplicationLocked()方法:

1
2
3
4
5
6
7
8
9
10
11
12
13
14
15
16
17
18
19
20
21
22
23
24
25
26
27
28
29
30
31
32
33
34
35
36
37
38
39
40
41
42
43
private final boolean attachApplicationLocked(IApplicationThread thread,
int pid, int callingUid, long startSeq) {
// ...
if (app.isolatedEntryPoint != null) {
// This is an isolated process which should just call an entry point instead of
// being bound to an application.
thread.runIsolatedEntryPoint(app.isolatedEntryPoint, app.isolatedEntryPointArgs);
} else if (app.instr != null) {
thread.bindApplication(processName, appInfo, providers,
app.instr.mClass,
profilerInfo, app.instr.mArguments,
app.instr.mWatcher,
app.instr.mUiAutomationConnection, testMode,
mBinderTransactionTrackingEnabled, enableTrackAllocation,
isRestrictedBackupMode || !normalMode, app.persistent,
new Configuration(getGlobalConfiguration()), app.compat,
getCommonServicesLocked(app.isolated),
mCoreSettingsObserver.getCoreSettingsLocked(),
buildSerial, isAutofillCompatEnabled);
} else {
thread.bindApplication(processName, appInfo, providers, null, profilerInfo,
null, null, null, testMode,
mBinderTransactionTrackingEnabled, enableTrackAllocation,
isRestrictedBackupMode || !normalMode, app.persistent,
new Configuration(getGlobalConfiguration()), app.compat,
getCommonServicesLocked(app.isolated),
mCoreSettingsObserver.getCoreSettingsLocked(),
buildSerial, isAutofillCompatEnabled);
}
// ...
if (normalMode) {
try {
if (mStackSupervisor.attachApplicationLocked(app)) {
didSomething = true;
}
} catch (Exception e) {
Slog.wtf(TAG, "Exception thrown launching activities in " + app, e);
badApp = true;
}
}
// ...
return true;
}

这里省略了大量代码,attachApplicationLocked()内部主要调用了两个关键方法:第一个是thread.bindApplication();第二个是mStackSupervisor.attachApplicationLocked(app),下面我们就分别来看一下这两个方法都做了什么。

  • thread.bindApplication()方法

这里的thread即上面调用ActivityThread的attach()方法传过来的mAppThread,它的类型为ApplicationThread,我们来看一下ApplicationThread的bindApplication()方法:

1
2
3
4
5
6
7
8
9
10
11
12
13
public final void bindApplication(String processName, ApplicationInfo appInfo,
List<ProviderInfo> providers, ComponentName instrumentationName,
ProfilerInfo profilerInfo, Bundle instrumentationArgs,
IInstrumentationWatcher instrumentationWatcher,
IUiAutomationConnection instrumentationUiConnection, int debugMode,
boolean enableBinderTracking, boolean trackAllocation,
boolean isRestrictedBackupMode, boolean persistent, Configuration config,
CompatibilityInfo compatInfo, Map services, Bundle coreSettings,
String buildSerial, boolean autofillCompatibilityEnabled) {

// ...
sendMessage(H.BIND_APPLICATION, data);
}

可以看到方法最后调用了我们熟悉的sendMessage()方法,接下来找到HhandleMessage()方法对BIND_APPLICATION消息的处理。

1
2
3
4
5
6
7
8
9
10
11
12
13
public void handleMessage(Message msg) {
// ...
switch (msg.what) {
case BIND_APPLICATION:
Trace.traceBegin(Trace.TRACE_TAG_ACTIVITY_MANAGER, "bindApplication");
AppBindData data = (AppBindData) msg.obj;
handleBindApplication(data);
Trace.traceEnd(Trace.TRACE_TAG_ACTIVITY_MANAGER);
break;
// ...
}
// ...
}

接着调用了handleBindApplication()方法:

1
2
3
4
5
6
7
8
9
10
11
12
13
14
15
16
17
18
19
20
21
22
23
24
25
26
27
28
29
30
31
32
33
34
35
36
37
38
39
40
41
42
43
44
45
46
47
48
49
50
51
52
private void handleBindApplication(AppBindData data) {
// ...
if (ii != null) {
ApplicationInfo instrApp;
try {
instrApp = getPackageManager().getApplicationInfo(ii.packageName, 0,
UserHandle.myUserId());
} catch (RemoteException e) {
instrApp = null;
}
if (instrApp == null) {
instrApp = new ApplicationInfo();
}
ii.copyTo(instrApp);
instrApp.initForUser(UserHandle.myUserId());
final LoadedApk pi = getPackageInfo(instrApp, data.compatInfo,
appContext.getClassLoader(), false, true, false);
final ContextImpl instrContext = ContextImpl.createAppContext(this, pi);

try {
final ClassLoader cl = instrContext.getClassLoader();
// 创建Instrumentation对象
mInstrumentation = (Instrumentation)
cl.loadClass(data.instrumentationName.getClassName()).newInstance();
} catch (Exception e) {
throw new RuntimeException(
"Unable to instantiate instrumentation "
+ data.instrumentationName + ": " + e.toString(), e);
}

final ComponentName component = new ComponentName(ii.packageName, ii.name);
mInstrumentation.init(this, instrContext, appContext, component,
data.instrumentationWatcher, data.instrumentationUiAutomationConnection);

if (mProfiler.profileFile != null && !ii.handleProfiling
&& mProfiler.profileFd == null) {
mProfiler.handlingProfiling = true;
final File file = new File(mProfiler.profileFile);
file.getParentFile().mkdirs();
Debug.startMethodTracing(file.toString(), 8 * 1024 * 1024);
}
} else {
mInstrumentation = new Instrumentation();
mInstrumentation.basicInit(this);
}

// ...
Application app;
// 创建Application
app = data.info.makeApplication(data.restrictedBackupMode, null);
// ...
}

方法内部创建了Instrumentation实例对象,最后调用了data.info.makeApplication()方法,data.info的类型为LoadedApkmakeApplication()方法在Activity的启动流程分析中也提到过,是通过类加载器创建Application对象,并且可以保证只有一个Application实例,这里就不展示了。
因此bindApplication()方法的目的就是创建Application实例对象。

  • mStackSupervisor.attachApplicationLocked(app)方法

mStackSupervisor的类型为ActivityStackSupervisor,我们来看ActivityStackSupervisor的attachApplicationLocked()方法:

1
2
3
4
5
6
7
8
boolean attachApplicationLocked(ProcessRecord app) throws RemoteException {
// ...
if (realStartActivityLocked(activity, app, top == activity, true)) {
didSomething = true;
}
// ...
return didSomething;
}

attachApplicationLocked()方法内部调用了realStartActivityLocked()方法,这个方法我们可能有点印象,在Activity的启动流程中也有分析到该方法,我们再来简单回顾一下。

1
2
3
4
5
6
7
8
9
10
11
12
13
14
15
16
17
18
19
20
21
22
23
24
25
26
27
final boolean realStartActivityLocked(ActivityRecord r, ProcessRecord app,
boolean andResume, boolean checkConfig) throws RemoteException {
// ...
// 创建Activity启动事务
final ClientTransaction clientTransaction = ClientTransaction.obtain(app.thread,
r.appToken);
clientTransaction.addCallback(LaunchActivityItem.obtain(new Intent(r.intent),
System.identityHashCode(r), r.info,
mergedConfiguration.getGlobalConfiguration(),
mergedConfiguration.getOverrideConfiguration(), r.compat,
r.launchedFromPackage, task.voiceInteractor, app.repProcState, r.icicle,
r.persistentState, results, newIntents, mService.isNextTransitionForward(),
profilerInfo));

// Set desired final state.
final ActivityLifecycleItem lifecycleItem;
if (andResume) {
lifecycleItem = ResumeActivityItem.obtain(mService.isNextTransitionForward());
} else {
lifecycleItem = PauseActivityItem.obtain();
}
clientTransaction.setLifecycleStateRequest(lifecycleItem);

// 执行事务
mService.getLifecycleManager().scheduleTransaction(clientTransaction);
// ...
}

接下来的流程就和Activity的启动相同了,最终通过发送消息依次调用ActivityThread的handleLaunchActivity()方法和performLaunchActivity()方法,完成Activity的创建等工作,回调Activity的onCreate()生命周期方法,就不再重复分析了。
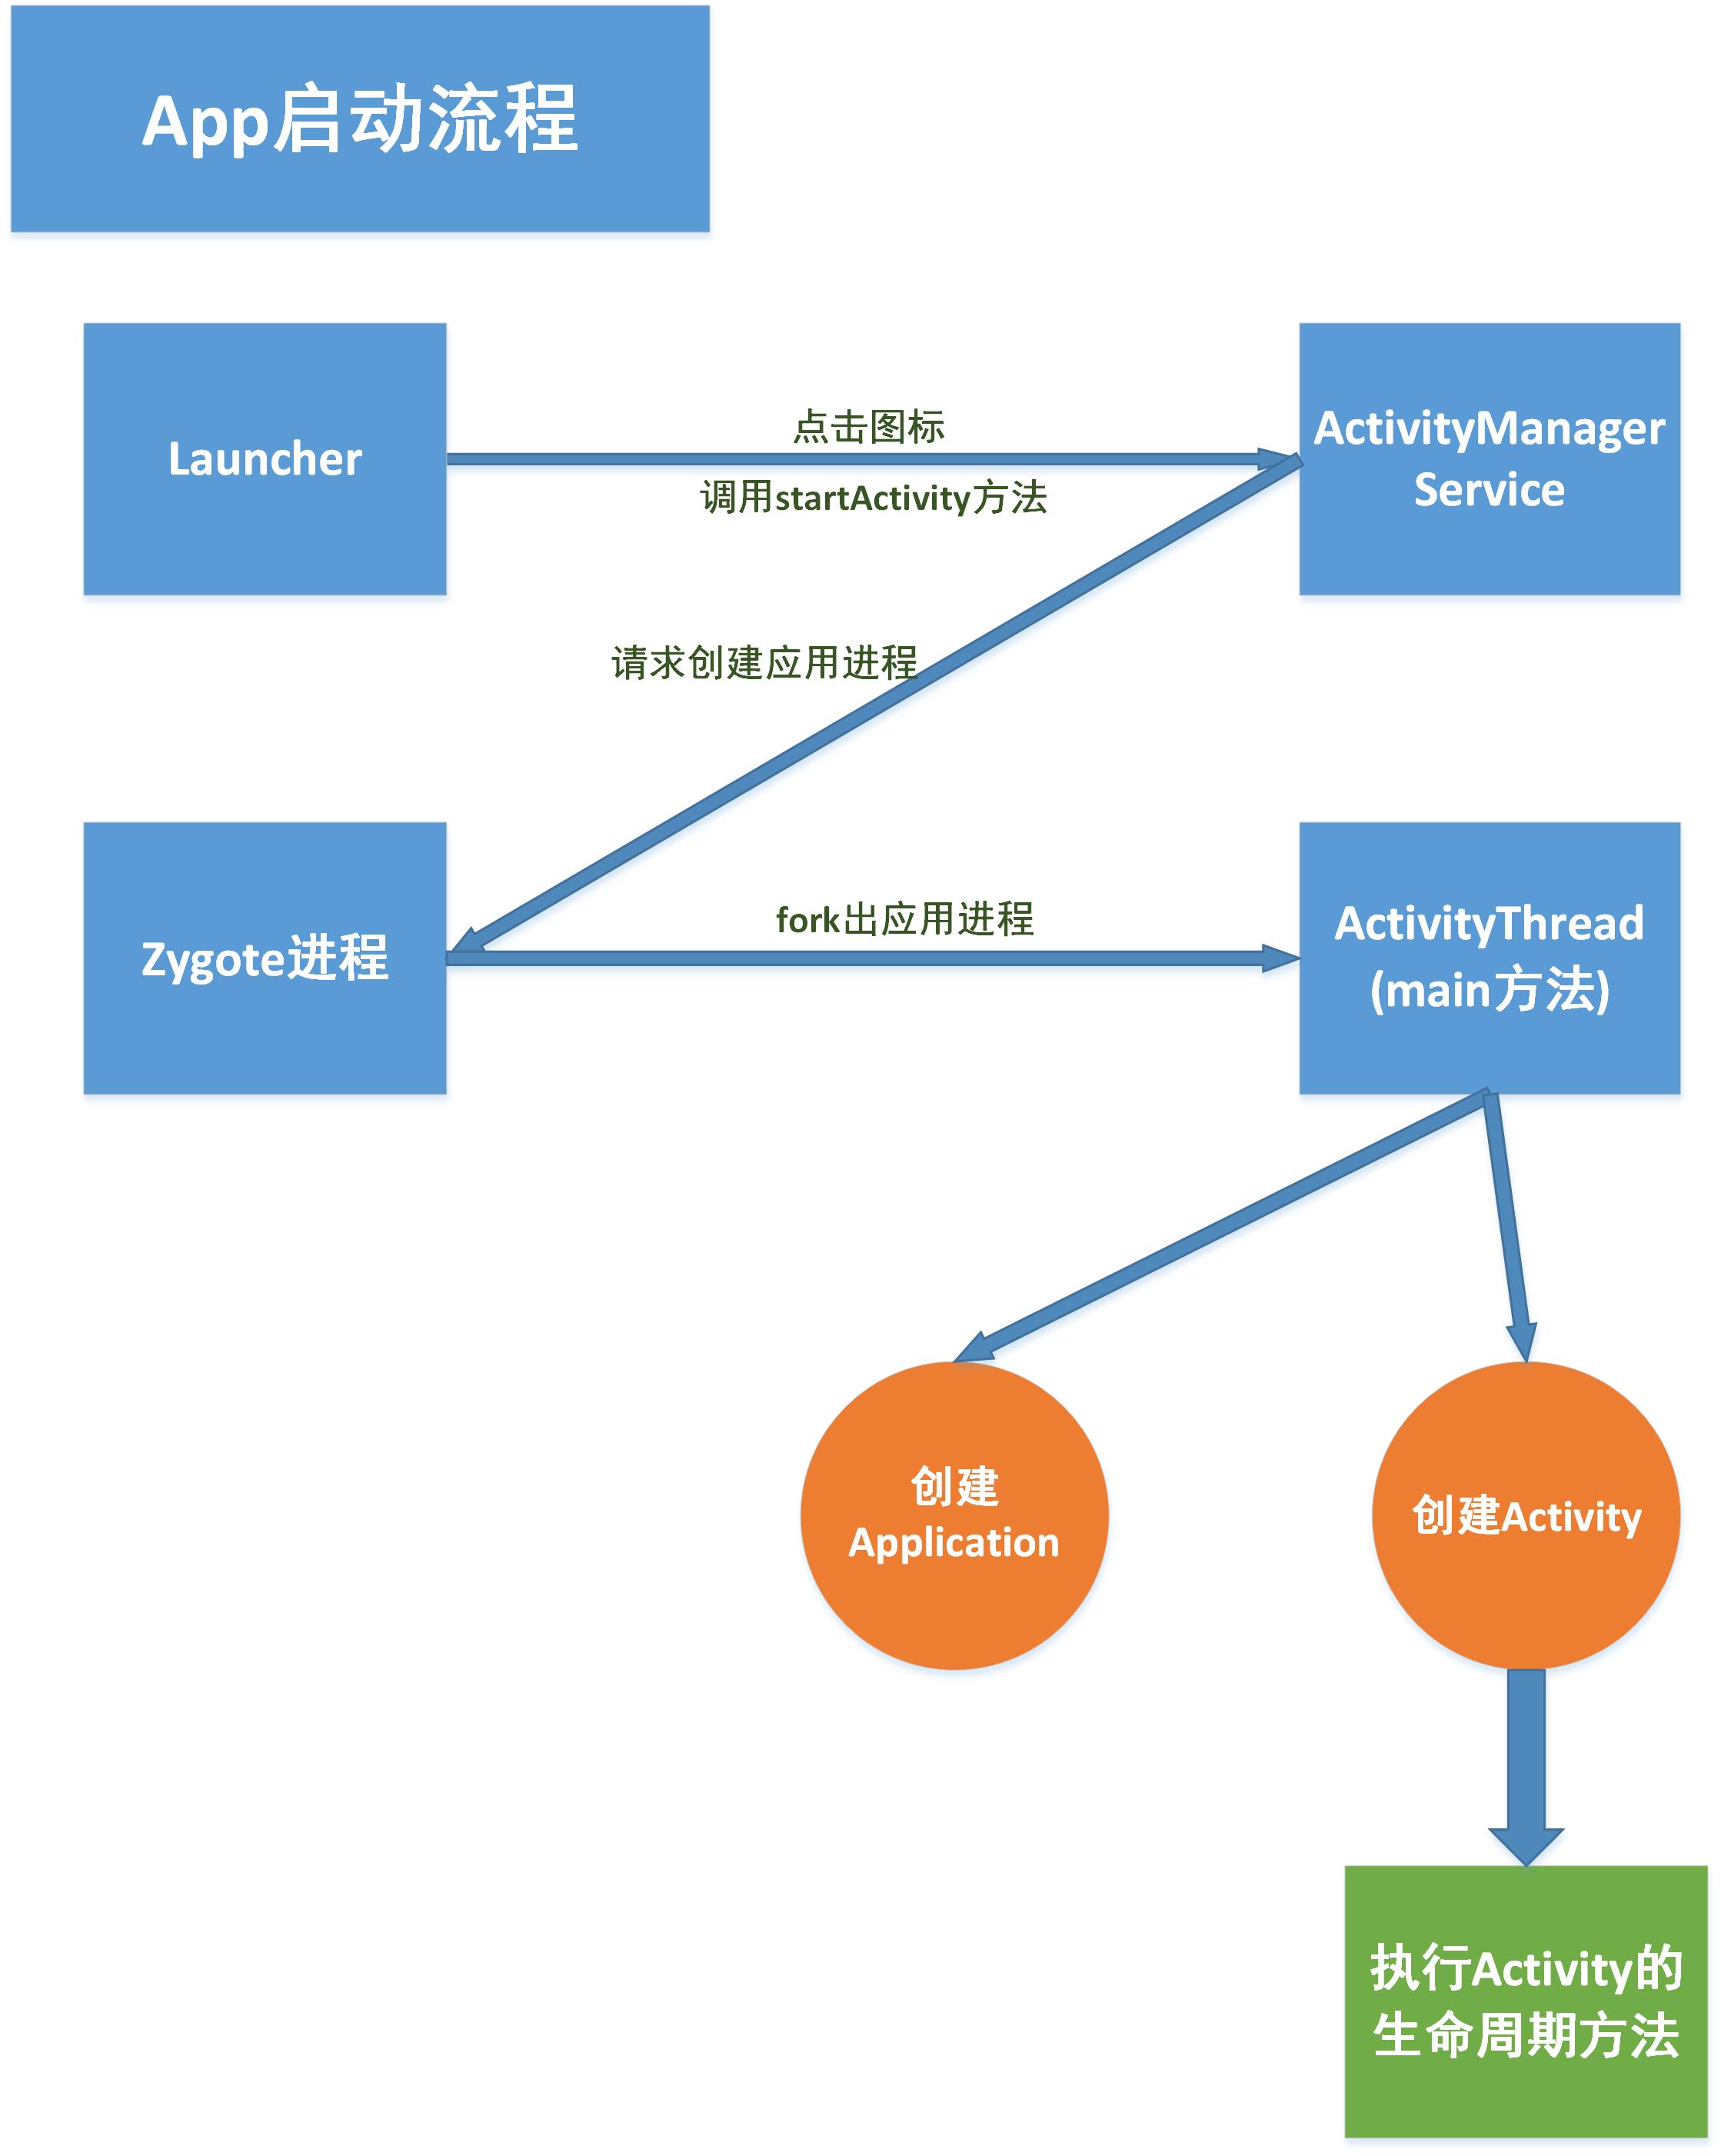
分析到这里,App的简单启动流程我们就清楚了,基本上和Activity的启动流程类似,不同之处是需要创建应用进程,一个简单的流程图如下所示:

App启动流程

总结

分析过Activity的启动流程后再来看App的启动流程会简单很多,因为有很多流程是相同的,本质上来开还是启动一个新的Activity,区别主要就在于需要创建应用进程,限于自身水平原因,这部分我也没有详细分析,有兴趣的话还是可以了解一下的。

参考文章

死磕Android_App 启动过程(含 Activity 启动过程)
Android启动流程 、app安装和启动原理

0%